
TECHNIQUE // TEAM AKER DÆHLIE
Team Aker Dæhlie is the first private ski team to compete at the highest level in Ski Classics and FIS-sanctioned races (World Cup, Scandinavian Cup, Norwegian Cup, etc.) that includes athletes from Ski Classic, FIS/All-round, Paralympic XC-skiing and younger age groups. Team Aker Dæhlie will spearhead a holistic approach, including athletic development, athlete health and career guidance. The team’s mission is to actively solve challenges related to the lack of equal opportunity to achieve within the sport of skiing – without regard for gender, age, disability, or nationality.
SKI TECHNIQUE
This new initiative has high ambitions and consists of people with different backgrounds and experiences. Since few of the team members have worked closely together, it was quickly agreed that there was a need to establish a common understanding around topics related to athletic development. One important topic was cross country skiing technique. In the presentation below, Team Aker Dæhlie wants to share the team's philosophy related to development of optimal technique. This document will serve as one of several important cornerstones to further development of the team and its athletes. The goal is for athletes and coaches to get a positive start on a long and great development process, based on a precise shared understanding of a complex topic. If we succeed, everyone will have equal opportunities to further develop according to personal goals and ambitions.
Team Aker Dæhlie's ambition is to share knowledge and experiences to inspire and motivate, but also to create discussion and opportunities to learn and further develop. The technical document is not intended to be static; hence it will be updated accordingly when new knowledge and experiences are available. Clubs, teams, associations, athletes, and others can freely use our technique philosophy, or develop their own in the case of different opinions. Team Aker Dæhlie does not have all the answers or solutions, but we hope, by actively contributing, we can take part in, and further strengthen, the good culture for sharing knowledge that has characterized Norwegian cross-country skiing in modern history. Together we can strengthen and further develop the sport we all love, beyond the borders of Norway.
TECHNIQUE GOALS // There are many goals related to working with technique, but the main goals are:
To develop the most effective and efficient way to ski so that the technique in it of itself becomes an instrument for achieving a performance goal (end result) and sub-goals (tactical choices) during a competition.
To utilize the ground contact optimally to create maximum forward propulsion. The goal is to optimize length, direction, and power of each movement.
Avoid injuries.
Continuous development/improvement requires disagreements, curiosity, discussions, and learning. Development accelerates in an environment where everyone can openly share and contribute thoughts, opinions, experiences, and reflections. Our only goal is for everyone to agree to always search for the optimal solutions. If you have two conflicting thoughts about a technique, our advice is that you try both solutions, and ultimately choose the one that works the best for you in any given situation. Learning through trial and error is important. Technique needs to be discussed in order for it to constantly evolve . It is natural, and good, that we do not always agree about every aspect of technique. For many, disagreement about technique creates an uncomfortable barrier and fear of communicating and sharing. It is not a weakness to admit mistakes, or even change your mind based on learning. Creating a safe environment for development is everyone's responsibility. A large part of ski technique is based on interpretation and understanding of how "physical laws" work to create power/speed, and part of technique is more art than science. In sum, everyone must share a strong motivation to always search for the technique/sub-technique that has the greatest potential. An athlete with sub-optimal technique can of course achieve good results through automation and training, but to become the best version of themselves, technique/tactics must always be challenged and improved.
Development of technique must be seen in the context of the holistic process of developing the athlete and the human being. Development is a process that requires patience and a long-term focus and dedication. Excellent knowledge of good technique does not suffice if the process for development and learning is not present. Great processes, together with professional knowledge and curiosity, lead to great results. Every athlete is unique. It takes a substantial amount of learning, practice, failing, evaluations and tweaking/modifications to find the right processes that lead to the best development for each individual athlete.
Thomas A. Edison is said to have made the following statement: "I have not failed, but I have found 10,000 solutions that do not work". Individual learning consists of finding solutions that do not work (and when) and the skill to identify what works (and when). Cross-country skiing is a complex sport with many external and internal factors that demand different solutions. To master cross-country skiing, every athlete must develop a large "toolbox" of technical solutions that can be adapted to all internal and external factors, as well as contribute to overall technique goals. Sustainable technique is the sum of all technical solutions that are applied throughout the competition. Internal and external factors, such as strength and physical capacity (inner) or length of competition or snow conditions (external), are factors that must always be considered when selecting optimal technical solution. Sometimes a non-sustainable technical solution is chosen due to tactical reasons. This could be, for example, a quick acceleration to shake off some competitors. Other times, athletes choose a sustainable technique that is not the fastest to conserve energy for a later crucial moment. The process of developing and expanding the technical "toolbox" and the learning related to consciously choosing optimal solutions must be prioritized by all athletes throughout their careers. "The athlete who thinks he/she is done learning has not learned but is done."
COMMON THEMES FOR ALL TECHNIQUES
Technique is a difficult topic where culture, language and tradition often stand in the way of optimal development. Keep in mind that not all athletes will understand and respond equally to instruction. Communication is "coding and decoding." Think of creative ways to describe and explain technique so that the athlete better understands. For descriptions of directions, one can, for example, use a clock, where 12 is the direction of speed. It is then easier to explain where the poles and skis should be placed on the ground by referring to a number on the clock. The athlete must have a clear picture in their head of the desired technical outcome. Always keep in mind that the goal is to find the causes of technical problems and not the symptoms.
Correct technique and the skier’s speed are directly related to the athlete’s body positions, strength, rhythm, coordination, mobility, length of force application, direction of force, frequency, and gearing.
A good position is an "athletic position." An athletic position can be recognized in many sports: for example, a goalkeeper getting ready to save a penalty shoot, a tennis or volleyball player receiving a serve. In such a position, the athlete stands in a stable and strong position with the weight evenly distributed on the feet (with the weight a little forward on the ball of the feet) allowing for quick reactions (push towards the ground).
Optimal technique requires tremendous physical capacity, strength, and mobility, but must also be adjusted to fit the athlete's given physical characteristics and relative strengths. Be aware that an easy and efficient technique is not always the best choice if the goal is to create high speed. We need to practice technique used in different phases of a competition. Sometimes it is right to choose an efficient technique, but then it is with a clear goal of saving energy and not to go fast. Selecting a technique should be just that – a technique you consciously choose, and not a technique you carry out based on bad habits.
Optimal technique should be used regardless of which intensity zone you are skiing at.
Rhythm is important, but not the most important.
The athlete must always practice the "right" techniques to be used in competitions. Every session is an opportunity to learn and develop optimal technique. It is not optimal to have a training technique and a race technique.
New techniques often feel heavier, strange, and different than the old, automated ones. Do not let this stop you from always seeking the technique with the greatest potential. Use each training session to challenge the technique execution. If you do not master a technique in training, it is doubtful that you will master it during a competition. Mastery requires time, focus, and patience.
Technique and technique choices are influenced by several factors, such as your physical shape, course profile, weather, snow, altitude, equipment, tactical choices, and competition length.
Weight transfer horizontally (from side to side) and vertically (up, down) are important for great technique. This requires good balance (nose-knee-toe line in most techniques), correct positions, as well as movements performed in the right sequence.
Active and correct use of your eyes/line of sight facilitates strong positions and correct sequencing of movements. If the eyes/head is raised/changes direction too early, the body will begin to fall too early, and the athlete will lose pressure and reduce the length of the push against the ground.
Upper and lower body work must be coordinated. The upper body strongly influences how the legs work. In a push/kick phase, the upper body must "wait" until the legs have started the kick; in this phase the legs are the “pilot” and the upper body follows. All motions start from the ground up. Good leg work from a balanced position leads to the weight transfer (vertical and horizontal). This requires the athlete to place the skis in positions where they serve as optimal "platforms" for an explosive and direct kick/push in the correct direction.
Arm pendulum: The arm pendulum produces a lot of force if carried out correctly. The arms are actively swung forward from the shoulders with maximum length and speed; we want a long pendulum in the desired direction. Before the pole action starts (poles enter the ground), the arms are bent at the elbow. As mentioned in the point above, the arm swing should reinforce the leg work, this requires an optimal pendulum length and direction which are coordinated with the leg work.
Unnecessary twisting and up/down movements should be avoided as they lead to energy leakage. Examples are: bobbing with the upper body, "double compression", twisting of the shoulders or twisting of the skis.
The poles should enter the ground as vertically as possible. Where it is flat, the poles should be about 90 degrees (perpendicular) to the ground with the pole tips far forward. This leads to a long contact phase with the ground. In steeper terrain the poles cannot be completely vertical, but the athlete should strive to place the poles as straight as possible to the ground.
A "strong" position with the arms is important to make optimal use of the poling action. An angle in the elbows (may vary slightly according to terrain/speed) is a prerequisite for a strong execution of the poling movement (we “lock” the angle in the elbow during the first part of the poling action) enabling utilization of all the large muscle groups. The elbows should also be close to the body and near parallel to the poles before starting the poling movement, enabling maximum power transfer to the poles (avoid "chicken wings"). In an acceleration phase, it may be appropriate to have the elbows out from the body to facilitate a quicker forward movement with the arms (high frequency). In the first part of the poling action, the muscles of the core (abdomen/back) are employed, and the forearm stays inactive with a locked angle in the elbow joint.
High position: A high position enables a better and stronger vertical weight transfer. This is important in most skiing techniques.
The technique cycle can be described in many ways. Where it starts is debatable (where does a circle start?). When we talk about technique in this document, the "start" of the cycle is where the athlete is in the highest position and is getting ready to put the poles into the ground. When training different aspects of a technique, it may be appropriate to change the start – end of a cycle to increase awareness of a specific area of technique execution. In double poling, it may be appropriate to change the starting point to the position where the arms are furthest back, in the case where the athlete needs to practice quickly getting back into a high strong position with a fall in the body utilizing the legs and an active arm swing.
All movements must be completed so that contact with the ground is maximized, and optimal blood flow is facilitated. Better blood flow is facilitated through small “micro breaks” where the muscles are relaxed and stretched. Completing all movements is therefore crucial for a sustainable technique.
Gearing/frequency is important. Everyone has their own gearbox. It is important to master and use several gears. Light and easy technique in high positions (high frequency) is often not the fastest, but the easiest. Most everyone is familiar with gearing when cycling, but not nearly as many take advantage of the “gears” when skiing.
The fastest skiers gain more ground per technique cycle, independent of frequency and terrain. This is due to the ability to produce increased force and the ability to use this force effectively.
Technique is not static. Technique/equipment/competition formats/training are constantly evolving. Excellent technique today may not be good enough in a few years.
HOW TO DEVELOP GOOD TECHNIQUE
Understand technique and be curious. Study technique videos and discuss with fellow athletes and coaches.
Do a GAP analysis: Where is the athlete strong/weak and what needs to be improved? It is often tempting to focus only on the technique elements where the athlete has the greatest potential for improvement, but it is equally important to communicate and give praise for technical solutions where the athlete performs well. Always prioritize to work with the most important issues first.
Technique change starts with technique awareness. It is challenging to be alert and to keep your concentration on technique for an entire training session. Athletes need to practice technical awareness. A good method is to set an alarm on the watch that beeps every 10 minutes as a reminder to focus on good technique execution.
Follow someone and learn what works/doesn't work. Afterwards, discuss your experiences and what you have learned.
Work together in pairs and try different solutions. For instance: the athlete in front skis with a high frequency and the athlete behind skis with a low frequency. After a few minutes, switch tasks, and then switch positions. Again, afterwards discuss experiences and learning.
Exaggerate “right and wrong”. For example, several sets of 15-20 seconds with the pole tips far forward followed by the pole tips far back. Feel the differences. Which technique choice has the greatest potential? If a technique is faster, but perceived as more demanding, it may be because the athlete has not practiced the execution enough.
Clear technical/tactical choices during intensive training on a fixed course. Examples of a session might be: Interval 1: self-selected frequency, interval 2: high frequency, interval 3: low frequency, interval 4: optimal mix of high and low frequency. Look at heart rate, time on course, lactate and learn what worked the best. Intensive training sessions also work great for ski testing. It's not just glide that determines if a ski is great or not.
Film and do video analysis with coaches and athletes. It is important to not just rely on video analysis. The feeling of the "right" (and wrong) movement is more important than a post-session video analysis.
Treadmill sessions with a trainer are an optimal arena for experimenting and learning technique.
Carry out GPS measurements / time studies where you compare speed in different terrain types, between laps and segments of the laps. Team Aker Dæhlie uses a GPS solution from Archinisis.
Train strength, mobility, and coordination in a "functional" way. We need to "think about skiing" when we are in the strength room and think about the learning from the strength exercises when we ski. Exercises in the strength room should reinforce what we are trying to achieve out on skis.
Imitation exercises without skis. Develop exercises for all skiing techniques in classic and skating to increase awareness of correct technique and required coordination.
Exercises on skis/roller skis, in all techniques, with and without poles.
TECHNIQUE IS A CHAIN REACTION
Technique is complex and can at times feel complicated and frustrating. The good news is that by being curious, determined, systematic and engaging in focused training over time, the athlete will get closer to developing their own optimal technique. No one has perfect technique; everyone has something that can be improved. The goal is continuous development and improvement. Every training session is an opportunity for learning and developing. Patience is the key to success. Whether you are a coach or an athlete, understanding good technique is the first step to developing good technique. The next step will be the approach, meaning the pedagogy and methodology for teaching/learning techniques. Often technique descriptions are picked apart, and the focus is on small details instead of the big picture. Thereby running the risk of losing the sight of the most important thing, namely the overall goal. In this context, the overall goal is the end product of the execution of several complex "chain reactions" (and if performed correctly - optimal technique). We must systematically design, plan and carry out training tasks so that the first/most important step is in place before we start with things that come later in the sequence of movements. Technique is a chain reaction of movements, where a perfectly executed step enables us to carry out the next step of similar quality. When you see a symptom/problem/challenge, you must analyze the entire cycle to find the underlying cause of the issue at hand. Often the cause of a symptom lies earlier in the "chain reaction". We must strive to identify the underlying cause, and not focus on resolving the observed symptom. Below is a systematic approach that we subscribe to:
Technique training is difficult as we are working on something very personal. It can be challenging to give/receive feedback as this is often perceived as criticism. Before a technique session, it should be made clear to everyone that the dialogue and process should be positive and constructive, not judgmental. The goal is to play and experiment with technique. The technique session is going to reveal technical solutions that don't work, and if we're lucky, also some that lead to positive change and mastery.
Spend time establishing common language, cues, understanding goals, and images
The correct position of the upper body, arm movements and the pole plant, are the first steps. The legs respond to, and are strongly influenced by, the upper body work. The upper body work/arms must create opportunities for the legs to work optimally. A short movement with the poles/arms usually results in a short leg push. The goal is to find the optimal place for the pole tips, which creates the potential for a good and powerful “hang” on the poles using the large core muscle groups. To explore and find the optimal landing spot for the poles, the athlete can "over swing" the poles and put the tip too far forward – and then gradually place the tips further back. This process will naturally reveal a place where resistance is heavy but manageable (In flat terrain the angle in the elbow is about 90 degrees).
After the upper body position, core utilization and start of the pole action, are executed correctly in front of the body, the next task is for the athlete to swing the poles far back and open the hand to let the poles swing freely. Most people stop the backswing too early.
When the work of the upper body is executed correctly, we start with the legs. The overall goal is that the athlete is in balance so that the kick/push is optimized. The goal is to hit the sweet spot every time, and to achieve maximum power out of every kick/push. In this phase, we start with vertical weight transfer (up/down in balance), optimal positioning of the feet/skis and a powerful kick/push where the power goes into the correct desired direction. We cannot start with weight transfer and balance, as these are end results.
The athlete should continually experiment by exaggerating what is "right" and what is "wrong" in each technique. The athlete must describe the feeling along the way. The exercises should be repeated, in all techniques, at different speeds and terrain types.
It is important to not make technique too complicated or give the athlete too many tasks to solve. Start with the big picture and give the athlete max 2-3 tasks per session (one task is for some enough). Often, minor challenges will automatically be corrected by focusing on larger ones.
CLASSICAL SKIING
DOUBLE POLING

1 // Starting position: Highest position with a fall forward and a stretched-out body. The stretching up and forward with the body will result in the athlete coming up on the ball of the feet, with the heels off the ski. The weight is on the balls of the feet. The arms are in front of the body, the elbows are swung up and forward, and the poles are ready to be put in the snow. The entire body should be in a light forward falling position, and not just the upper body. A characteristic of a good fall is that a line can be drawn through the shoulder, hip, knee, and ankle, and that this line forms an angle to the ground in the direction of speed that is less than perpendicular/90 degrees. From the side you can see that the ankle angle is pointed forward and the knees are in front of the toes.

2 // High position: The pole plant starts from a high and strong position, where the elbow angle is locked - the arms are bent at the elbow (elbow angle depends on speed, snow, terrain etc.), and the athlete tightens the muscles in the core and back to get ready for the impact.
3 // Pole plant: The pole tips are placed as far forward as possible (depending on speed, snow, terrain). At high speed, the poles are about perpendicular/90 degrees against the snow (may be individual differences).

4 // Core utilization: The pole movement starts by "hanging" on the poles, utilizing the larger muscles in the abdomen and back. It is important to have a strong core to utilize the force created by the impact. A normal mistake is that the athlete releases the forearm too early (unable to hold the angle in the elbow) resulting in a poor power transition from the core. The focus at the start of the pole plant is to "lock the arms". "Chicken Wings" (where the elbows point out from the body) are sometimes desired in an acceleration phase, but this is not a very strong position. For optimal use of the abdominal muscles, the head is kept in a neutral position – the head follows the movement of the upper body.

5 // Sequence: First, the body weight and larger muscles in the abdomen and back (locked elbow angle) are used (crunch – avoid swaying the back) and the body weight is lowered from the highest position (begin to close the "heel gap" and bend the knees slightly). As described in the point above, the goal is to create a powerful “hang” on the poles. A forward pointed ankle angle is important. Without a forward angle, bending the knees causes the athlete to sit down. This is a weak position, where the center of gravity is too far back. After the large muscles of the upper body have completed the initial movement (first the abdominal muscles, then the lats), the forearm (opening of the elbow angle) is activated, before the arms are stretched out behind the body (full opening of elbow angle). It is important to feel that the hands/arms are "accelerating" through the movement. Elbow angles can be used as descriptions of conscious gearing, on steep hills the poling motion is done with locked elbows, on lighter slopes the elbow angle is opened when the hands reach the middle of the thigh, and at high speeds deeper hands with full opening of the elbow angle where the hands swing as far back as possible. Be aware that there should be some knees bend, but you should not “sit down” with your hips back (heals come down on the ski too early). The center of gravity must remain on top of the feet.


6 // The way back: When the poles are finished behind the body, the athlete must swing the arms back to the starting position as quickly as possible. This movement starts with a solid push with the legs, creating pressure into the ground (think of a ski jumper, although we are not as deep as a ski jumper) where the arm swing is coordinated with the leg movement. The pressure from the legs, and the arm pendulum, pushes the athlete up and forward to the starting position described in point 1. The shoulders should be kept low to get an optimal arm pendulum. The poles tips are brought forward by pushing the elbows up and forward. If the athlete is struggling to get the pole tips forward, it may help to use the wrist to "chip" the poles forward. One can, for instance, imagine that the pole grip is a microphone you speak into and not a microphone you interview someone else with.


7 // Gearing: In steeper terrain, the frequency must be higher, and the movements/cycle made shorter. The athlete must have the arms closer to the body, have less/no release of the forearm, avoid going too deep, and return extremely quickly back to a high/forward position with upper body/hip. It is important that the athlete keeps an angle in the ankle that points slightly forward, to avoid sitting. In steep terrain, you primarily pull yourself up the hill with your abdominal muscles. Double poling has many gears. It is important to make conscious choices for different phases of the race (sprint/transport/start/finish) and for different terrain types. In long-distance racing, an energy saving "transport gear" is often used where the athlete has relatively straight legs and with the heels on the skis, mainly using the upper body to create a forward motion. This technique is used to save energy and to conserve the leg muscles for other parts of the race. Remember that gears should be selected based on the desired outcome/effect.
8 // A characteristic of good technique is that the athlete feels as if the skis accelerate forward in the hanging phase (no need for a conscious movement, this feeling is caused by a strong core utilization). If the skis and hips are left too far behind, it is a sign that the athlete is not compact enough in the “hanging” phase. If the athlete sits back the pressure in the abdomen is lost and the result is that the arms must compensate from the lost power.
DOUBLE POLE WITH KICK

1 // Starting position: The body has a forward lean/fall, the pole tips are far forward, and the elbows are positioned as in the double pole technique. The kick is completed, and the back end of the ski is lifted slightly off the ground.

2 // Pole plant: The pole tips are placed as far forward as possible (this depends on speed, snow, terrain type, etc.). At high speed, the poles are about perpendicular/90 degrees against the ground. Elbows are brought forward and up.

3 // Elbow angle: The arms are bent at the elbow (angle depends on speed, snow, terrain type, etc.).

4 // Core utilization: The pole movement starts with the athlete "hanging" on the poles, utilizing the larger muscles in the abdomen and back (first the abdominal muscles, then the lats). It is important to have a strong core to utilize the force created by the impact. A normal mistake is that the athlete releases the forearm too early (unable to hold the angle in the elbow) resulting in a poor power transition from the core. The focus at the start of the pole plant is to "lock the arms". "Chicken Wings" (where the elbows point out from the body) are sometimes desired in an acceleration phase, but this is not a very strong position. For optimal use of the abdominal muscles, the head is kept in a neutral position – the head follows the movement of the upper body.

5 // As the pole stroke starts, the rear foot swings forward. Towards the end of the pole stroke (when the hands are behind the body), the "new" kick foot is snuck forward to a position about half a shoe length in front of the other foot.


6 // Sequence: First the athlete uses the body weight and the larger muscles of the abdomen and back (crunch – avoid swaying the back), then comes the forearm, before the arms are stretched out behind the body. Important to feel that the arms are "accelerating" through the movement.


7 // Weight transfer: The weight is transferred to the "new" kicking leg. (This can easily be checked: if the heel of the other foot rises, then the weight is on the “new” kicking leg)

8 // The kick: When the back leg has completed the kick and is rising behind the body, the “new” kicking leg is straightened some. Then the entire body weight is lowered onto the ski. The athlete must be "heavy" on the kicking ski and press the ski explosively, straight downwards (initial part of the kick). The kick with the leg must be coordinated with a fast arm swing forward. The athlete should feel the pressure under the toe ball. It can help to think about quickly "opening" (stretch) and "closing" (crunch).


9 // Shifting: Frequency is adjusted according to speed and terrain, much like in the double pole technique.
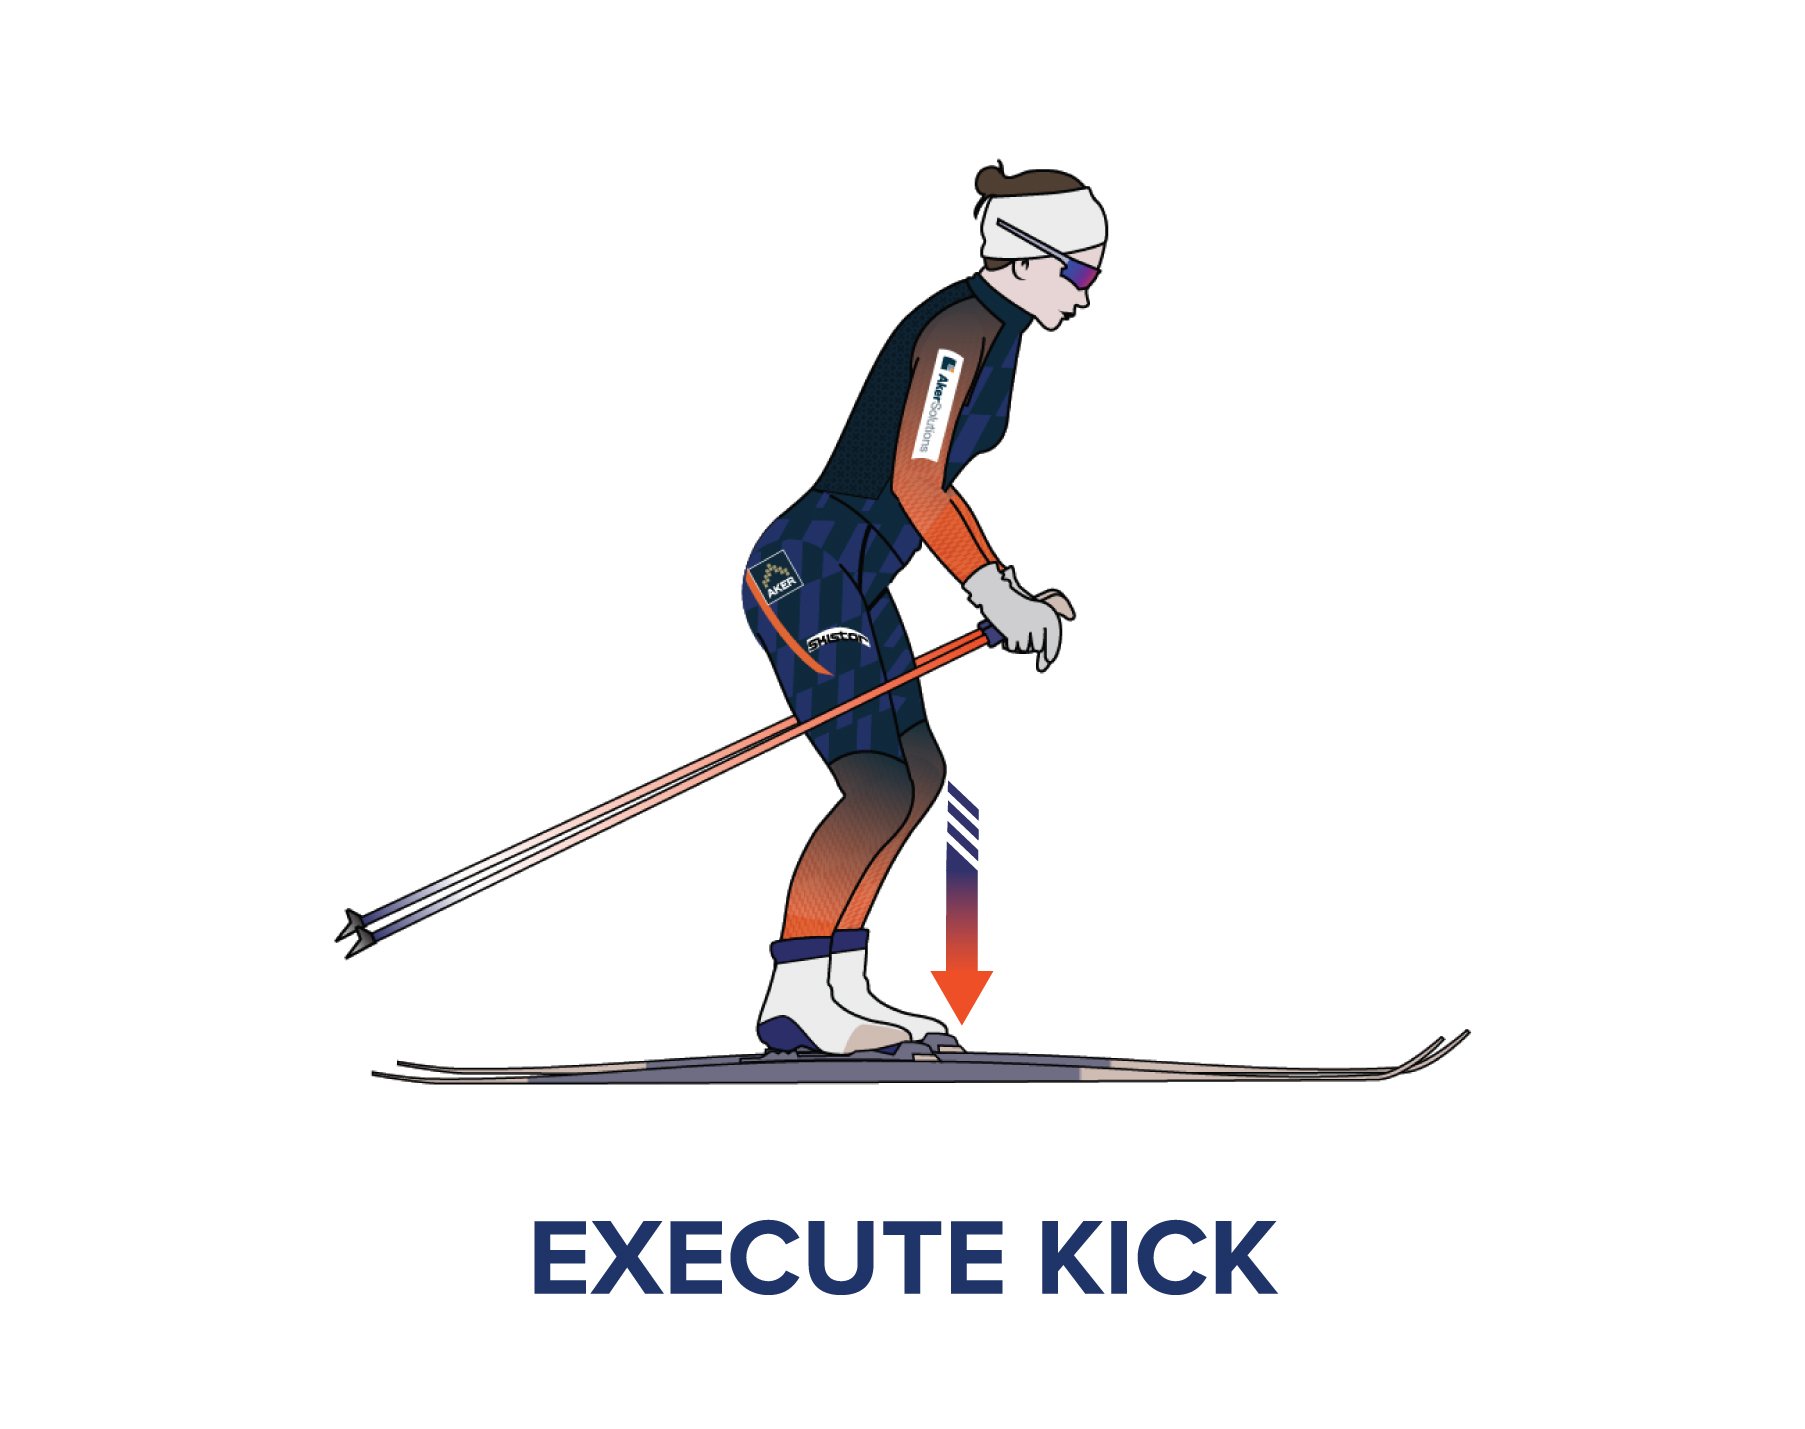
DIAGONAL STRIDE

1 // Starting position: One arm and one foot (diagonally) are behind the body and the other arm and foot (diagonally) are in front of the body. The skier is ready to put the pole tip in the ground. The weight is 100% on a relatively straight gliding foot (completed weight transfer and in balance: nose-knee-toe line). The body is in a calm and stable position where (when skier is seen from the side) a line can be drawn from the shoulder, through the body and to the ankle behind.

2 // Pole Plant: The pole is set as straight into the ground as possible. The elbow is bent in the starting position and the athlete first engages the larger muscles of the abdomen and back to create pressure against the surface (hang). Then the arm is pushed backwards until it is stretched out behind the body. From a side view, the arm is relatively straight when the movement is finished, and there is air between the back and upper arm. The trailing arm (coming from behind) is concurrently swung quickly forward. Remember that the arm pendulum, the poling action, kick, and leg pendulum should be coordinated. Shoulders and arms should be relaxed throughout the arm swing.


3 // Leg work: We start with a relatively high position with the hip, and a straightened kicking leg, subsequently we lower the body weight directly and quickly down towards the ski (vertical weight transfer). The goal is to be explosive and “heavy” on the skis to “set” the wax into the snow. The initial kick is about 90 degrees down in the snow with the stride length adapted to terrain and speed. The force from the push goes through the ball of the foot. In traditional diagonal, the skier should not have an exaggerated lift of the ski behind the body (as the kick is completed). It is better to have a relatively low back ski, as this will facilitate a longer kick, and a stable position. The trailing leg responds to the kick of the opposite leg and is swung forward quickly and coordinated with the swing of the trailing arm.


4 // Gaining height/high hip: As the back foot swings slightly up behind the body, the athlete "rises" on the new gliding leg. The athlete gets into a high position. (a relatively stretched leg).

5 // The upper body should be relatively calm and stable, without unnecessary up/down movements or twists, but at the same time all the muscles in the "core" must be activated.


6 // Head/Sight position: On gentler terrain the head/sight is towards the ski tips, on steep hills the head/sight is farther forward. A correct head position/line of sight facilitates an optimal rounding of the upper back. It is often advantageous to lower the chin to create a good position in diagonal.

7 // "Klæboteknikk": It is very similar to traditional diagonal, but the technique is characterized by higher frequency and more of a running movement with the legs. Execution depends on terrain and speed. The trailing leg is lifted more like in running.
8 // The herringbone technique is used on steep hills where the athlete does not have sufficient grip to ski diagonally or use the Klæbo technique. The skis are angled out to the side in a "V" shape and the ski is set down on the inside edge. It is important to have as narrow of a "V" as possible, to be relatively upright and to use the arms well. As in diagonal, it is important to find good balance on the skis to optimize the execution.
9 // Gearing: Arm pendulum and stride length must be adapted to terrain and speed. At high frequency, all movements are much shorter, and the skier is in a more upright position.
DOWNHILL TECHNIQUE
Illustration coming
1 // Sit low and balanced with the hands in front of the body. It is important to find a balance between the optimal position to avoid wind resistance and the muscular demands required to hold the position. Weight should be moved back to the heals to raise the kick wax from the snow when the speed and terrain does not demand a more balanced position with weight evenly distributed on the feet.
2 // Downhill speed is strongly influenced by how well/long the athlete works over hilltops. It is important to carry the speed into the downhill, hence it often pays off to work a little extra over the top of the hill, before getting into a downhill position. The result is higher speed, which makes the upcoming hill/flat section "shorter".
TURNING TECHNIQUE
Illustration coming
1 // It is Important to inspect turns prior to a competition to determine which line is the fastest and safest. Generally, it pays off to start the turn on the outside of the curve and then come out of the turn on the inside (safe and easy turn). In sprints/mass starts, the athlete must consider the entry/exit of turns in relation to current position in the field. The speed out of the curve is more important than the speed into the curve! In classic, it is important not to skid excessively around the curve, but rather step through (or start the turn from the outside) to protect the kick wax. Remember, too sharp of a turn often costs a lot of energy (and might not be safe) as the athlete must fight the turning force with the legs. When skiing a turn at low speed, the athlete should use the poles. It is important to place the poles in a good position as in the double pole technique, and that the kick from the pushing leg (outer leg/ski) creates maximum force against the snow.
2 // It is important that the athlete practices turning technique at low and high speeds. There are many who lose "unnecessary" seconds while skiing “easy” terrain without focus. It is important to keep in mind that the "cheap" seconds are just as important as the "expensive" seconds.
SKATING
Illustration coming
In the past, technique descriptions have often referred to the terms lead side and free side/glide ski. Good technique is not characterized by taking "time off" on one side or just gliding. In this document, the free/gliding side is therefore referred to as the push side, as the goal is to highlight the importance of active leg work and good arm use on both sides.
V2
Illustration coming
1 // Starting position: Highest position with a forward fall and relatively upright upper body. The Athlete gains height by straightening the weight carrying leg. Pressure is towards the ball of the foot (at high speeds the heel come off the ski). The arms are in front of the body, the elbows are swung up and forward, and the poles are ready to be put down into the snow. The entire body should have a slight fall forward, and not just the upper body. A characteristic of a good fall is that a line can be drawn through the shoulder, hip, knee, and ankle, and that this line forms an angle to the ground in the direction of speed that is less than 90 degrees. From the side you can see that the ankle angle is pointed forward and the knees are in front of the toes. The weight is 100% on the “gliding ski”, and the other leg hangs in a relaxed and natural position (both feet completely together is not desirable as this often leads to twists, early falls, and a weak push).
2 // High position: The poling action starts from a high and strong position, where the elbow angle is locked, i.e. the arms are bent at the elbow (angle depends on speed, snow, angle of the ground, etc.), and the athlete tightens the muscles in the core and back to get ready for the force of the impact. In this position the hands are held high - the athlete should be able to see the hands (in front of the head) without looking down.
3 // Pole plant: The pole tips are placed as far forward as possible (this depends on speed, snow, terrain type, etc.). At high speed, the poles are about perpendicular/90 degrees against the snow (there are individual differences).
4 // Core utilization: The poling phase starts with the athlete "hanging" on the poles, utilizing the larger muscles in the abdomen and back (resisting the force from the poling action with the stomach and back). A normal mistake is that the athlete releases the forearm too early (unable to hold the angle in the elbow) resulting in a poor power transition from the core. The focus at the start of the pole plant is to "lock the arms". "Chicken Wings" (where the elbows point out from the body) are sometimes desired in an acceleration phase, but this is not a very strong position. For optimal use of the abdominal muscles, the head is kept in a neutral position – the head follows the movement of the upper body.
5 // Sequence: First, the body weight and larger muscles in the abdomen and back (locked elbow angle) are employed (crunch – avoid swaying the back) and the body weight is lowered from the highest position, next comes the opening of the forearm, before the arms are stretched out behind the body. It is important to feel that the arms are "accelerating" through the movement.
6 // Leg work: At the same time as the athlete puts the poles into the ground, the leg compression movement starts by lowering the weight/bending the knee so that the weight of the body is lowered quickly towards the ground (vertical weight transfer). In this position, the athlete should stand on top of the ski, completely in balance. Once the athlete has the desired depth (charged spring) the initial push/kick starts down and to the side. The push off with the leg causes the weight transfer to the next foot/ski. The upper body should be stable, and the head faced in the direction of the tracks. It is important that the athlete retains the weight on the pushing leg as long as possible and completes a full powerful push – the foot accelerates through the push. In other words: While actively using the upper body, the athlete pushes the ground away with the leg. The push will bring the athlete forward along the ground.
7 // Land deep and slightly forward: The push brings the skier over to the new "gliding ski". The skier should strive to react to the push and take a small step forward, with the new "gliding leg". Land with a bend in the knee. The upper body must be in good balance over the ski. It is not desirable that the foot is in front of the center of mass. The ski should enter the ground where it is in an optimal position to start the next push (at high speed this is approximately in the direction of speed). Twisting of foot (”windshield wipers”) is not desirable.
8 // When the leg push and the poling action are completed, the athlete stretches the “gliding leg” to reach the high starting position as described in point 1. It is important that it is the leg that pushes the athlete up into a high position with the correct fall of the body (as supposed to just “jerking” the upper body upwards)
9 // Arm pendulum: When the poles are finished behind the body, the athlete must swing the arms back to the starting position as quickly as possible, where the arm swing is coordinated with, and initiated by, the leg pushing/stretching upwards/straightening. The pressure from the legs, and the arm pendulum, pushes the athlete up and forward to the starting position described in point 1. The arm pendulum reinforces the leg work.
10 // Unnecessary twists, rotations and up/down movements with the upper body should be eliminated. These are movements that do not create force in the desired direction.
11 // The poles should be released as far as possible behind the body at high speeds. In steeper terrain, the backwards motion is shorter. In very steep terrain the backward motion is so short that the athlete does not let go of the pole grip.
12 // It is important that the athlete raises and lowers the body weight (vertical weight transfer) from/to the ski with good balance BEFORE the leg push occurs.
13 // A long cycle is preferred, BUT that does not mean that the return to a high position should be slow. Long is not the same as slow.
14 // Gearing: When skiing at slow speed/steeper slopes, the frequency should be higher and the movements somewhat shorter. Important to practice gearing in different terrain types (similar to when biking).
V2 ALTERNATE
Illustration coming
V2 alternate is similar to V2 on the side where we use our poles. On the non-poling side (push side), we create power by loading the “leg spring” and use an active arm pendulum that is synchronized with the leg push off.
1 // Starting position: Highest position with a forward falling and relatively upright body. The athlete gains height by straightening the weight carrying leg. Pressure is towards the ball of the foot (at high speeds the heel comes off the ski). The arms are in front of the body, the elbows are swung up and forward, and the poles are ready to be put down into the snow. The entire body should have a slight forward fall and not just the upper body. A characteristic of a good fall is that a line can be drawn through the shoulder, hip, knee, and ankle, and that this line forms a forward sloping angle to the ground in the direction of speed that is less than 90 degrees. From the side you can see that the ankle angle is forward sloping and that the knees are in front of the toes. The weight is 100% on the “gliding ski”, and the other leg hangs in a relaxed and natural position (both feet completely together is not desirable as this often leads to twists, early falls, and a slight push).
2 // High position: The poling action starts from a high and strong position, where the elbow angle is locked, i.e. the arms are bent at the elbow (angle depends on speed, snow, angle of the ground, etc.), and the athlete tightens the muscles in the core and back to get ready for the force of the impact. The hands are, in this position, held high. The athlete should be able to see the hands (in front of the head) without looking down.
3 // Pole plant: The pole tips are placed as far forward as possible (this depends on speed, snow, terrain type, etc.). At high speeds, the poles are about perpendicular/90 degrees against the snow (there are individual differences).
4 // Core utilization: The poling motion starts with the athlete "hanging" on the poles, utilizing the larger muscles in the abdomen and back (resisting the force from the poling motion with the stomach and back). A normal mistake is that the athlete releases the forearm too early (unable to hold the angle in the elbow) resulting in a poor power transfer from the core. The focus at the start of the pole plant is to "lock the arms". "Chicken Wings" (where the elbows point out from the body) are sometimes desired in an acceleration phase, but this is not a very strong position. For optimal use of the abdominal muscles, the head is kept in a neutral position – the head follows the movement of the upper body.
5 // Sequence: First, the body weight and large muscles in the abdomen and back (locked elbow angle) are employed (crunch – avoid swaying the back) and the body weight is lowered from the highest position, next comes the opening of the forearm, before the arms are stretched out behind the body. It is important to feel that the arms are "accelerating" through the movement
V1
Illustration coming
1 // Starting position: Body is in an aggressive forward falling position, with an equal angle in the torso and the push side ankle (of the foot entering the ground). The pushing foot (on the poling side) is placed in a position where it can instantly push the ground away. The lead arm pole (hang arm) is in a position where it can be placed vertically into the ground, the opposite pole is angled backwards ready to work alongside the body. The push from the non-poling side (push side) is completed
2 // Body position: The upper body is stable, like on a surfboard, without twists or up/down movements. The body will get some lateral movement/displacement caused by a powerful leg push.
3 // Pole plant: Both hands are in front of each respective shoulder. The lead pole is as vertical as possible (often it helps to think that we should raise the hand WITHOUT the upper body following) and the non-poling side pole is slightly angled backwards. The forearm is parallel with the lead pole. It may be advantageous that the grip of the pole is slightly closer to the body than the pole tip, in other words that the pole is tilted slightly towards the body. This will make the power/force from the poling action go in the same direction as the push from the leg. The pole grip/hand on the non-poling side is lower and in front of the shoulder – it should not be in front of the zipper of your jacket.
4 // Poling action: Body weight is lowered onto the pole and the athlete uses the large muscles in the abdomen and back to create a powerful “hang” on the pole. The athlete should feel that the abdominal muscles are actively working during the first part of the poling motion. After the stomach crunch/”hang”, the athlete uses the muscles in the back and arms to push the arms backwards until the hands are behind the buttocks and the poles can be released. At low speed, the movements become shorter, often without releasing the poles.
5 // Leg work poling-side: While actively using the upper body, the athlete pushes the ground away with the leg. The push will bring the athlete forward along the ground. It is important that the ski lands in a position where the athlete can immediately push in the right direction. Seen from the front, the knee is over, or slightly on the inside, of the big toe, in other words; the athlete should not strive to ski too narrowly with the feet too close together. Try landing on a flat ski or slightly on the inside edge of the ski. On flatter hills the knee is more over the foot. On steeper hills the knee is more on the inside of the foot. Viewed from the side, the athlete should have a forward leaning angle in the ankle, approximately equal to the angle of the upper body. The push should be long and coordinated with arm and upper body work. The foot accelerates through the movement.
6 // Leg work non poling side/push side: (often called "free side/gliding side"): Athlete places the weight on the non-poling side leg with an angled knee (charged spring and in an athletic position). It is important that the athlete lands with the ski in a position where the push can come instantly (land slightly on the inner skis). The push leg/ski must be angled so that the athlete can push in the right direction up the hill. The push ski forms the platform from which the athlete pushes. Once the athlete has full weight onto the leg, the push starts, coordinated with a strong arm pendulum. It's important that the timing is correct!
7 // One way to visualize the direction of the push is to think of a clock. 12 o'clock is the direction of the speed. The push from the left leg pushes from about 8 o'clock and the right leg lands at about 2 o'clock. The right leg pushes from about 4 o'clock, and the left leg lands about 10 o'clock. The focus should be on creating a solid PUSH in the right direction and not on "taking a big step" up the hill. The push from the non- poling side leg (coordinated with arm swing) should create momentum in the right direction. A ski low to the ground is preferable to a high one, where the athlete lifts the ski into the air (think about keeping the ski along the surface, and not up).
8 // On gentler slopes where we use longer cycles, both hands must finish behind the buttocks. The best skiers manage to do this even on steeper slopes.
9 // The head/direction of sight is toward the ground, towards the ski tips (low chin)
10 // It is important to keep the “wheel turning” without a pause – the athlete should go directly from one push to another.
11 // It can often be worthwhile to think of a jumping V1 technique in order to get the timing (leg push and arm swing) in place on the non-poling side/push side. Several of the best athletes choose a jumping skate technique in competitions – beware, it is a low gentle jump along the ground up the hill and not up in the air and/or to the side. The athlete must always strive to push the ground away with the leg, while actively using the upper body, (the push will bring the athlete forward along the ground.), as supposed to taking a step up the hill or falling/twisting from leg to leg.
12 // Gearing is important to master. The gearing must be adapted to the physical fitness level, speed, snow, terrain, tactics and goals. At a lower speed, all movements become somewhat shorter and faster (higher frequency).